WHEW!!!!!
Well, all the preparation for the first event was worth the experience and hard work. I must say that it was a fun journey which the fruits of my labor will be useful for a good long while to come.
The event was a whole other new experience -- a good one. It was one that those who do events are quite familiar with -- wake before the sun to load up and make it to the event location, find your assigned spot and get things set up...It was a BEAUTIFUL day! A long day...An overall, actually quite enjoyable, day! Watching my darling husband work the crowds was a real treat! If they don't remember anything else about us, they will remember that we were not afraid to smile and engage in pleasant dialogue with them! Having the opportunity to interact with folks was awesome. And the two buying customers (friends) made the whole process worthwhile!
Our location was not exactly ideal, but we have been assured that next week we will have a prime location -- this week was a very effective trial run. Learned a few lessons (VELCRO is our FRIEND! LOLOL) that we will use to make the NEXT event better. I was SO glad I went ahead and purchased the wall kit for the canopy because it came in handy right off the bat...The "breeze" was quite GUSTY which of course does not play nice with necklace boards/displays (refer back to VELCRO comment above). LOL
Our setup itself was attractive. There were more jewelry vendors there than I was told would be allowed. And apparently the supposed handmade only requirement -- turned out to not exactly be the case. There was lots of "re-sell" items on the other tables. I can say, with pretty confident certainty, that, we and one other couple, had real gemstones, sterling silver items and were actually hand made (the other couple went a step further than us and hand cut and polished their own stones. In fact, two of our wrapped pendants were stones we bought from them at the same market last year.). We had many, many compliments from those that did make it to the back side of the property and visited our tables. And we passed out a TON of cards. Several ladies have custom pieces they are going to be contacting us with and one lady is bringing in a stone to have us re-wrap for her that she had previously purchased from someone else!
Overall, we thoroughly enjoyed ourselves, even with the given *minor* hurdles associated with participating in an outdoor event. All of the vendors that we met were quite pleasant and ALL of the folks that stopped by were awesome to have had the opportunity to meet! Major kudos to the event coordinator -- she did a fine job! And we were SO GRATEFUL for the lunch and endless supply of fresh cold bottled water!
We are looking forward to next Thursday!

Welcome to our blog! Here you will find anything from our latest hand-crafted jewelry adventure, event information or ramblings that strike us as notable. Feel free to check out our Facebook Fan Page (Kat's Custom Kreations) and Follow us on Twitter (Kats_Kreations) to see the most up to date happenings. Thanks for stopping by! Kat & Dave
Friday, November 6, 2009
Monday, October 26, 2009
Preparation -- busy busy!
Here I go again -- seemingly silent on the blogosphere. But, don't you worry! I've been busy, busy, busy over here!
Not only is our day job business picking up (slowly but I think I can, I think I can assuredly!) but I have been scurrying about preparing for the upcoming events! All the research and purchases along the way in preparation of doing events seems to be coming together quite nicely. I had purchased the banner, canopy and door/walls back in the summer (made sure and got the commercial vented top canopy I REALLY wanted rather than what was at the local hardware store); we made the canopy leg weights from PVC pipe caps and rope; found some nice black, vinyl top, fold in half, folding tables at Walgreens (via a lady in the table aisle in Sam's no less LOL); made the table skirting and found some lace for table runners; AND scored some glass blocks and folding chairs from freecycle (http://freecycle.org to find your local branch); then got a black shelf for it; signed up for a merchant account so I can accept credit card payments...LOTS OF PREPARATION! Not to mention working on inventory to fill the tables! LOL! I had ordered an old fashion type knuckle buster credit card imprinter (nice one that even takes a 5 line name plate) so that I could give the customer a receipt and have record of their information and signature to prevent back-charges but there was a little hiccup that occurred which had to be remedied (ordered online and the company failed to catch that I had ordered long slips with a short slip machine -- lovely), but that is in the process of being resolved. AND the credit card swipe machine has been shipped and will be here in plenty of time for the first show! Now, if I can get wireless internet with the laptop we will be in business - literally!
Of course there are always the last minute things to take care of, but I think this is probably the first time in my life that I have prepared enough in advance that if there ARE any other hiccups they should be minor (KNOCK ON WOOD!!!!!!!! LOL).
Here is a pic of the practice setup of the booth...

I have already made some adjustments to it: I took a VERY nice suggestion from a fellow local wire wrap jewelry artisan for adding more interest and functionality to the display by adding a shelf supported by glass blocks -- turned out fabulous! And I finished the lace table runners to go across both tables and the new shelf. I am VERY pleased with how it is coming together! I will update this post with a new pic when we do the first event and have everything set up. :)
So, as you can see, things have been quite busy over here - in stark contrast to the crickets and silence. LOL
Be sure to keep up to date on scheduled events by regularly checking the Event Calendar on our website. We have several weeks of events scheduled and would love to have you pop over to say hey and maybe even find something you just can't live without!
Not only is our day job business picking up (slowly but I think I can, I think I can assuredly!) but I have been scurrying about preparing for the upcoming events! All the research and purchases along the way in preparation of doing events seems to be coming together quite nicely. I had purchased the banner, canopy and door/walls back in the summer (made sure and got the commercial vented top canopy I REALLY wanted rather than what was at the local hardware store); we made the canopy leg weights from PVC pipe caps and rope; found some nice black, vinyl top, fold in half, folding tables at Walgreens (via a lady in the table aisle in Sam's no less LOL); made the table skirting and found some lace for table runners; AND scored some glass blocks and folding chairs from freecycle (http://freecycle.org to find your local branch); then got a black shelf for it; signed up for a merchant account so I can accept credit card payments...LOTS OF PREPARATION! Not to mention working on inventory to fill the tables! LOL! I had ordered an old fashion type knuckle buster credit card imprinter (nice one that even takes a 5 line name plate) so that I could give the customer a receipt and have record of their information and signature to prevent back-charges but there was a little hiccup that occurred which had to be remedied (ordered online and the company failed to catch that I had ordered long slips with a short slip machine -- lovely), but that is in the process of being resolved. AND the credit card swipe machine has been shipped and will be here in plenty of time for the first show! Now, if I can get wireless internet with the laptop we will be in business - literally!
Of course there are always the last minute things to take care of, but I think this is probably the first time in my life that I have prepared enough in advance that if there ARE any other hiccups they should be minor (KNOCK ON WOOD!!!!!!!! LOL).
Here is a pic of the practice setup of the booth...

I have already made some adjustments to it: I took a VERY nice suggestion from a fellow local wire wrap jewelry artisan for adding more interest and functionality to the display by adding a shelf supported by glass blocks -- turned out fabulous! And I finished the lace table runners to go across both tables and the new shelf. I am VERY pleased with how it is coming together! I will update this post with a new pic when we do the first event and have everything set up. :)
So, as you can see, things have been quite busy over here - in stark contrast to the crickets and silence. LOL
Be sure to keep up to date on scheduled events by regularly checking the Event Calendar on our website. We have several weeks of events scheduled and would love to have you pop over to say hey and maybe even find something you just can't live without!
Friday, October 16, 2009
Dragonfly Lapel Pin work in progress
I thought it would be neat to share the journey in progress in photo format of how the Dragonfly Lapel Pin came to be.
I hope you enjoy seeing the progress!
The pieces for the body and wings were measured and cut of sterling wire.

The wire ends of the body at the head were balled which will later become antenna...wings were soldered on.

Now that everything is assembled, pickled, finished out and polished, time to begin weaving!I hope you enjoy seeing the progress!
The pieces for the body and wings were measured and cut of sterling wire.

The wire ends of the body at the head were balled which will later become antenna...wings were soldered on.


The first wing took FORRRRRRRRREVERRRRRRRR...

First wing finished and moving on to the body...Antenna formed into shape.
The second wing went MUCH quicker...WHEW!
You probably wouldn't believe how much wire was actually used in this little guy!

Perched upon a shell rose...A lovely place to rest after all that work!

The second wing went MUCH quicker...WHEW!
You probably wouldn't believe how much wire was actually used in this little guy!

Perched upon a shell rose...A lovely place to rest after all that work!

Tuesday, September 8, 2009
Sterling, Garnet and faceted fiery Labradorite Dragonfly
 Front
Front Back
BackThe initial intent was for it to be a necklace pendant but I believe this one will be more suited as a pin and one of heavier gauge wire for the body be fashioned as a pendant. This is nice and lightweight and would work perfectly as a pin...How to attach the pin finding (without glue of course!) will be the next challenge. :) *see update below!*
Dimensions: 2" from top to bottom x 3" wingspan
Click here to see more information on this piece.
Oh! By the way, I also made the flower the dragonfly is sitting on. It is made from shells I collected from our beach. :) If you would like one of your own, I have them for sale in my mom's store in Claremore, OK. It comes complete with a poem I wrote -- the roses symbolizing our walk with Christ and our lives as broken shells.
UPDATE! I am very pleased to say that the dragonfly is now a PIN! I sat down this evening with wire and tools and was able to fashion a pin back and successfully wrap it onto the back side of the body. Nice and tidy! PERFECTO!!!
Friday, September 4, 2009
Beading Storage Dilemma
Front


I had recently been involved in a thread/conversation of a wire wrap jewelry Yahoo group regarding the dilemma of storage and organization of beads, tools and materials. I shared my roll around beading station with them and several thought it was a great idea so I thought I'd share it with you all here!
It all started with my sister showing me her roll around cart. It was a simple project that morphed into what you are about to see. I just can't leave well enough alone.
I took a trip to the local Target and picked up a nice heavy duty Rubbermaid type 4 drawer roll around cart style cabinet...after I loaded it up with all my stuff I quickly realized that rolling it on the tile with all that weight the wheels literally came off...so off to Harbor Freight we went and picked up a light duty furniture dolly to set the cart on. I had a couple of sheets of pegboard that was just behind a door that held strands of beads, findings, etc. for a few months. I screwed one of the pieces of pegboard to the back of the cart (not only had the wheels fallen off but it became "rickety" from rolling across the tile) which gave it immediate stability! Since the pegboard was taller than the cart I also had storage on the back side of the pegboard (seen standing in front of the cart) for more storage. I then drilled holes on both sides to hang my bead bins (aka hardware storage bins usually found in a garage for screws and such) and hung one on each side of the cart using pegboard hooks. To make it easier to roll around, since the furniture dolly is slightly wider than the cart, I screwed a cup hook on each end of the furniture dolly exposed top and one into the end of a stick long enough to use as a handle... :)
TA DAAAAAAAAA!!! Works perfectly as a roll around cart that can be stashed away in a corner (note...clean out corner to store cart in. LOL).
It all started with my sister showing me her roll around cart. It was a simple project that morphed into what you are about to see. I just can't leave well enough alone.
I took a trip to the local Target and picked up a nice heavy duty Rubbermaid type 4 drawer roll around cart style cabinet...after I loaded it up with all my stuff I quickly realized that rolling it on the tile with all that weight the wheels literally came off...so off to Harbor Freight we went and picked up a light duty furniture dolly to set the cart on. I had a couple of sheets of pegboard that was just behind a door that held strands of beads, findings, etc. for a few months. I screwed one of the pieces of pegboard to the back of the cart (not only had the wheels fallen off but it became "rickety" from rolling across the tile) which gave it immediate stability! Since the pegboard was taller than the cart I also had storage on the back side of the pegboard (seen standing in front of the cart) for more storage. I then drilled holes on both sides to hang my bead bins (aka hardware storage bins usually found in a garage for screws and such) and hung one on each side of the cart using pegboard hooks. To make it easier to roll around, since the furniture dolly is slightly wider than the cart, I screwed a cup hook on each end of the furniture dolly exposed top and one into the end of a stick long enough to use as a handle... :)
TA DAAAAAAAAA!!! Works perfectly as a roll around cart that can be stashed away in a corner (note...clean out corner to store cart in. LOL).
I have another one for my soldering/fusing and miscellaneous out in the Florida room - pool side! :)
Top

Side

Back

Monday, August 31, 2009
More goodies!
Kambaba Jasper
 I tell you what, I don't know when I have been so pleased with a bead order as I have with the last order I received from Magpie Gemstones! I have had the most fun just going through the beads over and over and riding the resulting wave of inspiration! I am anxiously awaiting the arrival of my next order!
I have added a couple of new bracelets to the website. This design is proving to be quite comfortable as well as attractive. My husband, David, says that the Kambaba Jasper bracelet is his favorite! The patterns in the Kambaba Jasper is absolutely breathtaking. It's a shame that I can't seem to capture the patterns effectively with the camera. I am in constant awe that these beads originated from the earth! What amazing and precious gifts they are to us. And to be able to adorn our bodies with them is all the more exciting!
I hope you enjoy the fruits of my favorite past-time...gazing deep into a tray of beads!
Silver Needle Agate
Apricot, rich taupe and white

Apricot, rich taupe and white
Friday, August 28, 2009
Silver Needle Agate Sterling Wire Wrapped Bracelet

This bracelet is the latest creation of my newest bead shipment...I just LOVE this stone - Silver Needle Agate. It has so many beautiful colors and patterns in the same strand. The two different size barrels gave inspiration for this bracelet. It is so beautiful on! And coordinating a ring with it - soooooooo pretty! Even if I do say so myself! LOL If you work in an office, this bracelet with a coordinating ring would brighten your day just getting to look at them all day while you type!
If you are interested in purchasing this bracelet it can be found on my website (click here) as well as the coordinating ring selection (click here).
Friday, August 21, 2009
Rings, rings and more rings!
Rust Web and Brecciated Jasper
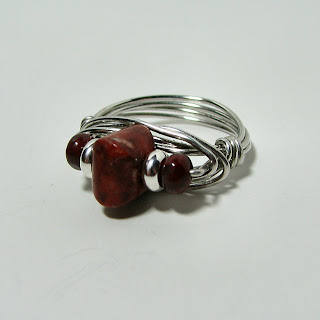 I have been making product detail pages for the new rings the past few days! Some of the rings shown on the New Rings gallery page are sneak preview photos but about half of them have their product detail pages set up. I have also added a few more rings! I still can't believe how beautiful these are turning out! I am going to be making multiple configurations to accommodate a wider range of ring sizes (which is why some of the detail pages are not finished, YET...) this weekend. It is like I've found a hidden treasure and my imagination is just going wild with ideas for it all! I just seem to be stuck in ring mode right now...Which is perfectly alright with me! I needed some fresh new styles! :)
Seems like any time I get close enough to the tray of beads, wire and my tools I am cutting more wire to wrap up more rings! TOOOOOOO FUN!!!!
 I have been making product detail pages for the new rings the past few days! Some of the rings shown on the New Rings gallery page are sneak preview photos but about half of them have their product detail pages set up. I have also added a few more rings! I still can't believe how beautiful these are turning out! I am going to be making multiple configurations to accommodate a wider range of ring sizes (which is why some of the detail pages are not finished, YET...) this weekend. It is like I've found a hidden treasure and my imagination is just going wild with ideas for it all! I just seem to be stuck in ring mode right now...Which is perfectly alright with me! I needed some fresh new styles! :)
Seems like any time I get close enough to the tray of beads, wire and my tools I am cutting more wire to wrap up more rings! TOOOOOOO FUN!!!!

Botswana Agate Rondelles
Friday, August 14, 2009
Oh boy, oh boy, OH BOY!
Can you tell that I am sooooooooooooooooo excited?! I received another yummy bag of goodies from Magpie Gemstones today! I do believe my muse is rolling around giggling in a pile of beads tonight!!! I am in full on ring mode!

Brown Opal

Silver Leaf Jasper

Rust Web jasper

Kambaba Jasper

Mica

Brown Opal

African Turquoise Jasper

Silver Needle Agate
Monday, August 3, 2009
YouTube Début!
Believe it or not, I have been pretty busy over here lately! We have had family in town - it has been quite a lot of fun getting to bead and hang out with my sister and her family. I have been wanting to put some pieces on YouTube to expand my base but didn't know how to go about it. So, while my sister and her family was in town my niece, Kurstin, taught me how to make a video of my jewelry photos. Kids are so smart now-a-days!
Kat's Custom Kreations - YouTube Jewelry Video Presentation
Feel free to check it out if you have a chance! I hope to be putting together more to post so subscribe if you'd like. :)
Kat's Custom Kreations - YouTube Jewelry Video Presentation
Feel free to check it out if you have a chance! I hope to be putting together more to post so subscribe if you'd like. :)
Subscribe to:
Posts (Atom)
